TMG Reporter
Installation guide
Fastvue Reporter can be up and running in as little as five minutes following this simple installation guide.
Minimum Server Requirements
Download Fastvue Reporter and install on a machine (or virtual machine) that meets our recommended requirements below.
Installation
Note: In order to import data and run reports as fast as possible, Fastvue Reporter can be resource intensive. We do not recommend installing Fastvue Reporter on a server that provides a critical services such as a Domain Controller, DNS server, or DFS server. We recommend installing on a dedicated VM (virtual machine) so you can scale the resources appropriately.
To install Fastvue Reporter:
Double-click the downloaded setup exe on a machine that meets the above requirements.
The installer automatically installs and configures the required pre-requisites which include .Net 4.6 and IIS (Web Server and Application Server roles). It will also install Open JDK and Elasticsearch in its own self-managed directory.
Once the pre-requisites have been installed, proceed through the installation wizard. It will ask you for:
Installation folder Only application files are installed to this folder and it does not require much disk space. The default is C:\Program Files\Fastvue\{Product Name}.
Website and Virtual Directory This is the website and sub-folder (virtual directory) within IIS to install the Fastvue Reporter website into. The default is Default Web Site. If you have other websites installed on your server, it is a good idea to either create a new website in IIS first and install to that, or use the 'sub-directory' option and enter a name such as ‘fastvue’ or ‘reports’. This creates a contained 'virtual directory' in IIS under the main website which you can access using
http://yourserver/fastvue(for example).Data Location This is the location where all imported data, configuration and report files are stored. Specify a location with plenty of disk space. The default is C:\ProgramData\Fastvue\{Product Name}.
Navigate to the Fastvue Reporter web interface in your web browser. If you are on the server you installed, this will be
http://localhostorhttp://localhost/sub-folder-nameif you specified a sub-folder in step 3 above (replacesub-folder-namewith the actual name you specified). You can also replacelocalhostwith the server's name or IP address to access the web interface from a different machine.
Upgrading
To upgrade an earlier version of Fastvue Reporter, simply run the new installer over the top of your existing installation. The installer will pick up your existing settings, so just click next throughout the wizard without making any changes. Once installed, browse to the site and clear the browser cache by hitting ctrl + F5 (cmd + R on Mac).
Note that it can take a few minutes for data to start importing again after upgrades and restarts of the Fastvue Reporter service. You can check the database initialisation progress in Settings | Diagnostic | Database.
Automated / Silent Deployment
If you need to deploy or upgrade Fastvue Reporter silently or to multiple servers in an automated way, please see our comprehensive Reporter 4.0 PowerShell script.
Access Microsoft Forefront TMG's log files
The way Fastvue Reporter imports data from your TMG Server varies depending on the Forefront TMG's logging options.
In Forefront TMG, go to Logs & Reports and select Configure Web Proxy Logging on the right hand side. In this dialog you'll see there are three logging options:
SQL Server Express database
Microsoft SQL Server database
File logging
The SQL Server Express database and File Logging options both store the log files on the TMG server. To access these logs, you need to use the Fastvue Arbiter setup process below.
For Microsoft SQL Server databases, you can connect the Fastvue Reporter server directly to the external SQL server, and the Fastvue Arbiter is not required. Jump straight adding a Source in Fastvue Reporter below.
Fastvue Arbiter setup for TMG's local logs
The Fastvue Arbiter is a light-weight application that you install on your TMG server. It connects to Forefront TMG’s local logs and sends the data securely to the Fastvue TMG Reporter server on port 49361.
The Fastvue Arbiter does not need to be installed if Forefront TMG is logging to a remote SQL server. You can connect Fastvue Reporter directly to the remove SQL Server.
If you are using File Logging, make sure the W3C Text option is selected. Native *.iis text logs are not supported.
To install the Fastvue Arbiter, download and run the Windows installer for Fastvue TMG Reporter onto your TMG server, and select the section option. Proceed through installation wizard using the default options.
Add Access Rule
Once the Fastvue Arbiter has been installed, you need to create an Access Rule on the TMG server to allow communication between the Fastvue Arbiter and TMG Reporter
The rule should Allow TCP 49361 Outbound from the TMG Reporter server to Localhost for All Users.
To do this:
Open Forefront TMG’s Management Console and select Firewall Policy on the left hand side
Click Create Access Rule on the right hand side. This launches the Access Rule wizard.
Give the access rule the name Fastvue and select Allow as the Rule Action.
Select Selected Protocols from the drop down list and click Add…
Click New… | Protocol on the tool bar to launch the new Protocol Definition Wizard.
Call the Protocol Fastvue. On the Primary Connection Information page click New… and select: Protocol Type: TCP Direction: Outbound From: 49361 To: 49361 Click OK and click Next.
Select No to Use secondary connections and click Finish to add the protocol
Expand the User-Defined folder, select the new Fastvue protocol and click Add.
Back on the Access Rule Wizard, click Next.
On the Access Rule Sources page click Add…
Click New… | Computer on the toolbar and enter the name TMG Reporter and enter the IP address of the TMG Reporter Server. Click OK.
Expand the Computers folder, select the newly added TMG Reporter computer and click Add.
Back on the Access Rule Wizard, click Next. On the Access Rule Destinations wizard, click Add…
Expand the Networks folder and select Localhost then click Add.
Back on the Access Rule Wizard, click Next. On the User Sets page, leave ‘All Users’ in the list and click Next.
Click Finish to add the rule.
The Fastvue Arbiter should now be sending log data to the Fastvue Reporter server.
Add a Source
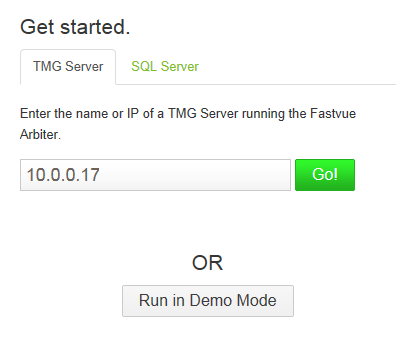
In your web browser browse to the Fastvue TMG Reporter site you installed in step 1 (e.g.http://10.1.1.1/tmgreporter). If you have not yet configured a source, you will be directed to the Start page. You can add your first TMG Server as a Source on this page, or in Settings | Sources.
Add a Fastvue Arbiter source
If you're using the Fastvue Arbiter to receive Forefront TMG's local log files, simply add the IP address of your TMG server and click Add Source.

Add a SQL Server source
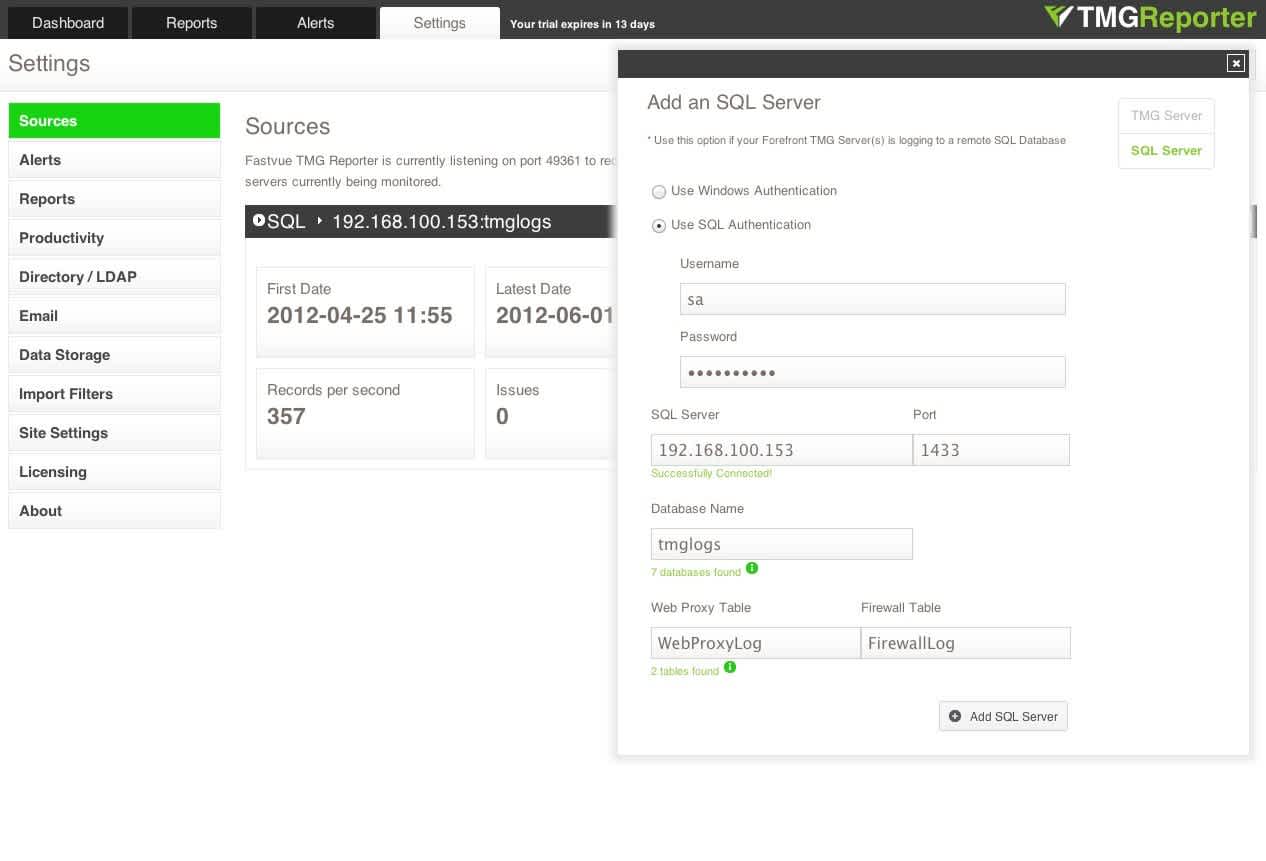
If Forefront TMG is logging to a remote SQL Database, go to Settings | Sources and click Add Source. Use the ‘SQL Server’ option to enter the credentials required to connect to your SQL Server, and select the database and tables that TMG is logging to.

Note: If you are using Windows Authentication, make sure the machine account (domain\machine$) of the Fastvue TMG Reporter server has read access to the database.
Tip: If you have more than one Web Proxy or Firewall table, you can enter wildcards such as *Web* to select MyWebProxy1, MyWebProxy2 etc. Or just enter * and TMG Reporter will check every table in the Database.
Enable/Disable TMG Servers
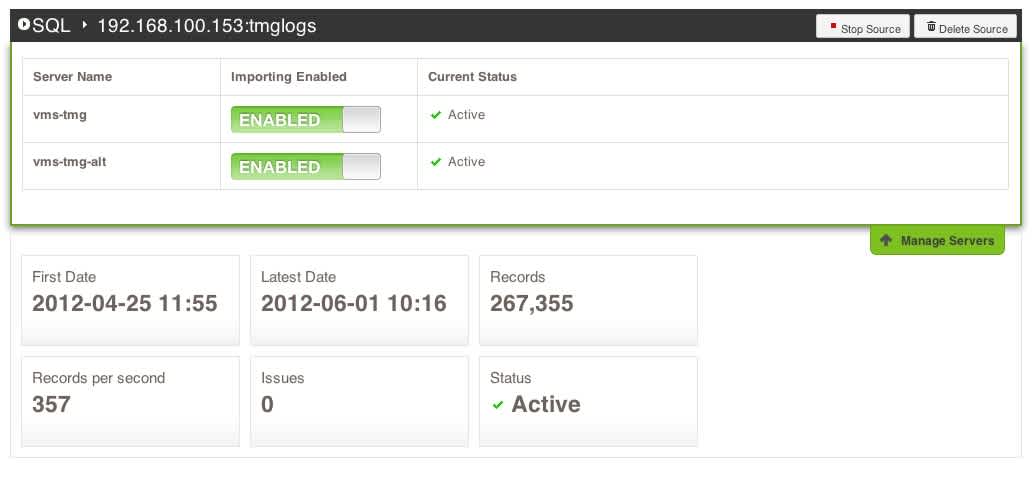
When importing data from a remote SQL Server, there is an additional Manage Servers tab on your new SQL Source. Click this tab to view a list of all the TMG Servers found to be logging to the database. You can enable and disable importing from these servers as required.

Note: TMG Reporter’s licensing is based on the number of TMG Servers you need to monitor. Note the number of servers in this list before purchasing.
Enjoy
Now you can try out the many features of Fastvue Reporter!